When I first started using EKS several months back, I was pretty impressed by the platform. Coming from an on-premise world where you have to manage literally everything from hardware to the Kubernetes infrastructure, EKS provided a breath of fresh air.
However, it didn’t take long before the honeymoon phase started to wear off. Things that I would expect to be in place for a hosted Kubernetes provider just weren’t there. Two major things that stuck out to me were version updates (now available, thanks CVE-2018-1002105), and graceful pod draining on any sort of scheduled maintenance such as AMI upgrades or instance resize/scaling.
In other hosted Kubernetes platforms like GKE and AKS, an upgrade initiated on a node will first cordon and gracefully “drain” each node before upgrading/replacing it. When a drain is initiated on a node, the Kubernetes API performs an “evict” on each pod currently running on the host. In turn, the evict functionality sends a “SIGTERM” signal to each container in the pod. In a well built container, this “SIGTERM” will be handled and the container will be gracefully shutdown, performing any preparation steps it needs to do on the way down.
The lack of clean evictions of pods burnt us several times, particularly on stateful applications where abruptly terminating a process could leave the persistent data in an unclean state. After spending hours recovering from this after planned maintenance, I decided to implement tooling to fill this gap and I’m happy to be able to share this with the world!
Exploring Options
We looked at several options that we found while googling. There was a github issue around this issue, and ways people solved it, but I was unable to find anything that shared a step by step implementation plan and the code to go along with it.
AWS also provides you with guidance to use eksctl which will drain nodes enabling blue/green node flips between node pools. While I would have preferred this, we had business requirements which made this not an option. We needed a better solution, one which would hook in to the existing workflow and make it seamless for us.
As a result, I decided to build a solution, and for the first time in my career, truly open-source a project! The repo for the project can be found on my GitHub.
The Workflow
The workflow is quite simple, once you walk through it.
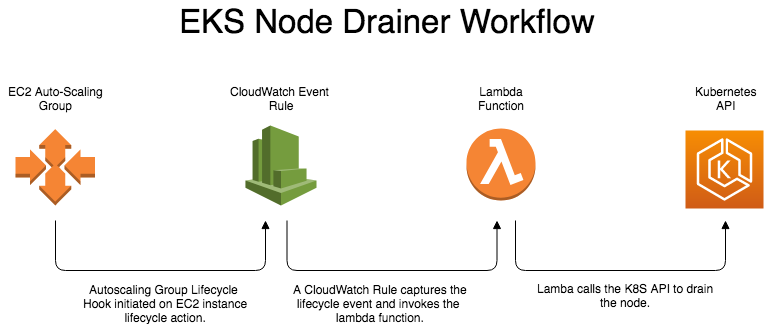
First, let’s look at how the fleet management of EKS works.
The instances in an EKS cluster are typically managed by EC2 Auto-Scaling groups (ASG) which is configured to maintain a fixed number of EC2 instances. If you were to go in to the AWS console and delete one of the EC2 instances in your cluster, the ASG will automatically launch another node with the configuration specified by the ASG’s launch configuration, bringing your node count back to the number of instances specified by the ASG.
ASG’s have a really neat feature called “Lifecycle Hooks” which allow you to perform specific actions on either an instance launch or instance termination. This lifecycle hook event is then captured by a CloudWatch Event Rule, which can then do many things, including call a Lambda.
So, if we leverage the lifecycle hooks on the EKS clusters auto-scaling group, we can have a CloudWatch rule invoke a Lambda when a node termination happens, which in turn can call the K8S API to drain the node before allowing the termination to continue.
Let’s take a look at each of these components in depth to learn how they work. My project includes a CloudFormation template that will deploy most of the artifacts, so you don’t have to worry about deploying them if you wish to use this, but it’s important to know how it all works together.
Auto-Scaling Group Lifecycle Hook
As mentioned, the heart of EKS’s fleet management is managed by an EC2 auto-scaling group. This auto-scaling group ties together the configuration that EKS instances are deployed with (EC2 Launch Configuration) to the desired scaling parameters to create a logical grouping of EC2 instances. The auto-scaling group is what defines the number of nodes that are in your EKS cluster, adjusting the desired number of instances up or down on the auto-scaling group will either launch or terminate instances to match your new desired count.
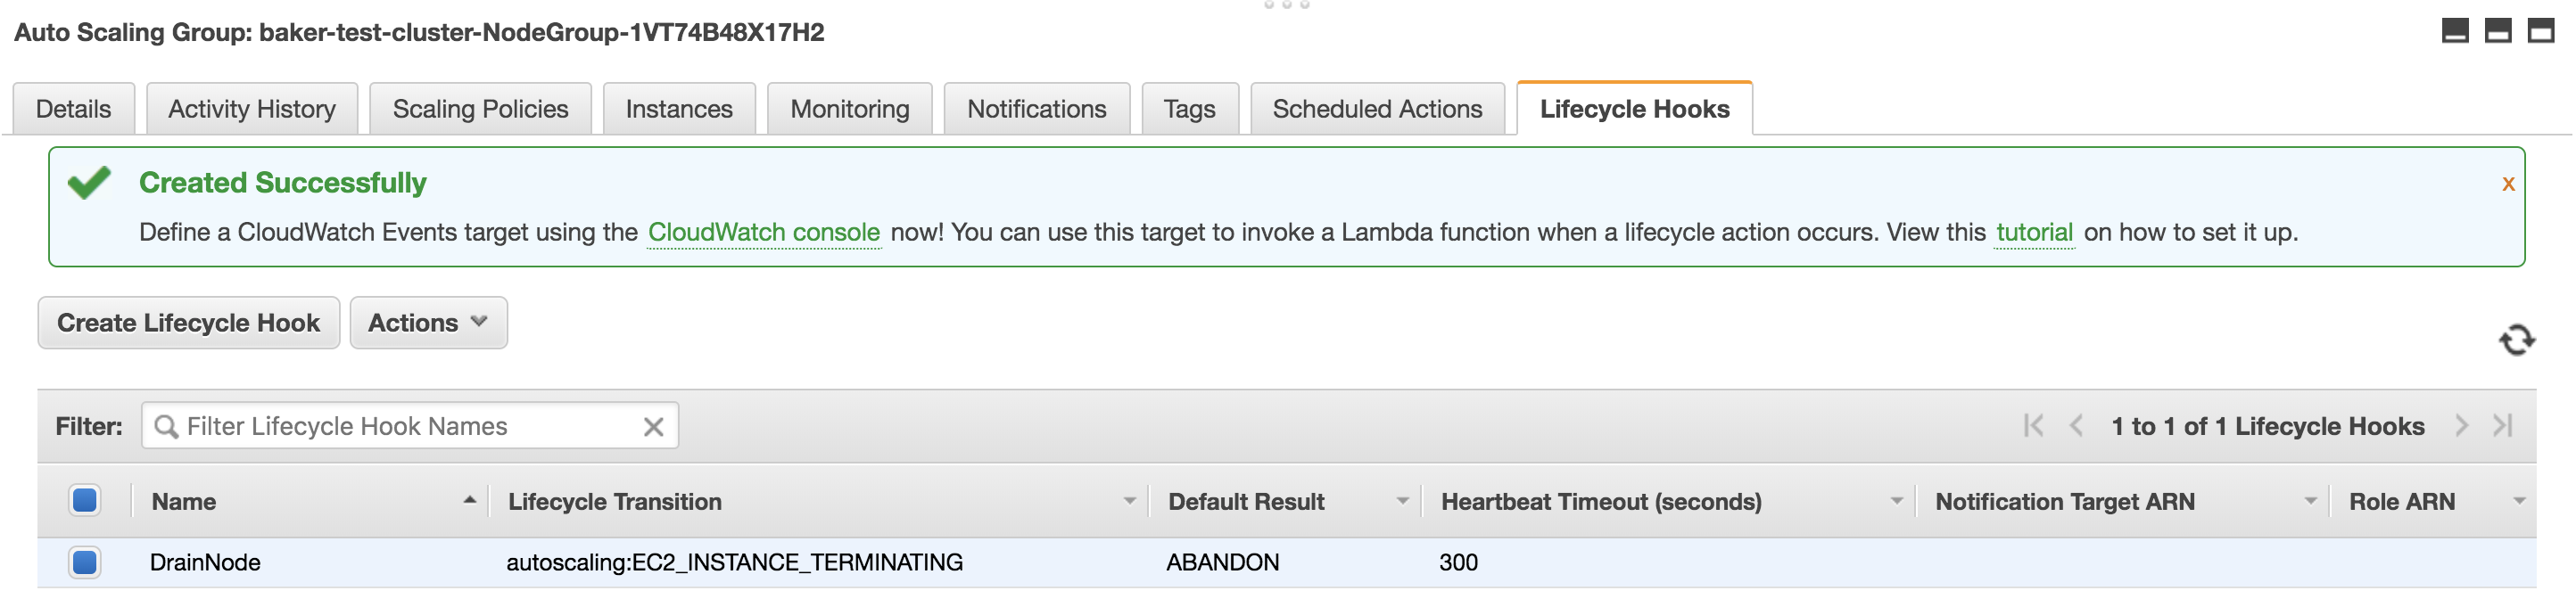
Often times, before nodes are launched or terminated, some sort of action needs to be taken in order to prepare an application for the addition/removal of an instance. To facilitate this, Amazon provides an auto-scaling group lifecycle hook, which can be used to perform any needed action when a lifecycle event occurs. Since our desire is to drain all pods off a node before it’s terminated, we’ll be able to take advantage of this functionality as our initiation point for the workflow. Perhaps looking at the configuration of this once it’s deployed will help make it clear how it works, so let’s take a look at a deployed lifecycle hook.
| Field | Value |
|---|---|
| Lifecycle Hook Name | An arbitrary name for the lifecycle hook |
| Lifecycle Transition | We only need to take action when a node is terminated, so “Instance Terminate” is used |
| Heartbeat Timeout | 300 is what I found works the best for our workload, but this can be adjusted to meet your needs |
| Default Result | This will be what happens when the timeout is reached. We chose abandon to kill of the lifecycle hook. Choosing continue would just allow the terminate of the instance to continue |
| Notification Metadata | Put the name of your cluster here. This is important because it will be passed to the Lambda, which is used to build the K8S context within the Lambda |
CloudWatch Event Rule
We’ve talked about the lifecycle hook creating an event, but there still needs to be a mechanism to capture that event and take action on it. That’s where the CloudWatch Event Rules come in to play. These rules consume the stream of CloudWatch events and invoke targets when certain events are captured. In our case, this will be the lifecycle hook that we just set up.
This CloudWatch rule will be created by the CloudFormation template in the repo, but lets review how it’s configured.

There are a couple components here that we care about. The first configuration is the Event pattern. Let’s look at the configurations and explain what they are doing:
| Field | Value |
|---|---|
| source | This is the AWS service that generates the event. Since we’re watching for auto-scaling events, our value is “aws.autoscaling” |
| detail-type | This the type of event that’s coming from the source. Since we want to take action when an instance is going to be terminated, our value is “EC2 Instance -terminate lifecycle action” |
| detail | This is the list of auto-scaling groups to watch for events from. This supports multiple groups so multiple clusters can be handled by a single rule |
Next, we define the target for the rule to invoke. In our case, this is the Lambda function that will actually do the draining of the nodes.
Lambda function
The lambda function is the brains of the whole operation. It’s written in Python, and I added a ton of inline documentation to really walk you through what the Lambda is doing, so I highly recommend taking a look at it here.
At a very high level, the function does the following:
- Convert the EC2 instance ID received from the CloudWatch Event metadata to a hostname so it can be used to call the K8S API to drain the node
- Generate a kubeconfig file that can be loaded for K8S API calls. Inside the lambda, I am leveraging the aws-iam-authenticator to handle the EKS authentication
- Cordon the node via the K8S API
- Loop through every pod on the node, evicting them individually
- Wait for all pods to complete eviction
- Tell the ASG lifecycle hook to continue on
It was a bit surprising to me when I started working on this that the “drain” command which exists in the K8S CLI, does not actually have a corresponding API command. After doing a bit of research and looking at the source code, I realized that the CLI is actually handling the orchestration to cordon the node and the perform an evict on each pod individually, so I had to recreate that workflow inside the Lambda.
In order for the CloudFormation to create the Lambda, you’ll need to upload the zip file located in the repo to S3 in a bucket named “eks-node-drainer”. A future blog post will contain the instructions for how you can build the Lambda if you wish to do that, as I came up with some pretty neat automation to do so.
Deploying the service
Deploying the service is a simple 3 step process.
- Create the ASG Lifecycle Hook
- Deploy the CloudFormation which creates the CloudWatch Event Rule, Lambda, and the needed IAM Roles.
- Apply the K8S roles to allow the Lambda to authenticate with K8S
It makes more sense to keep the deployment steps tied to the project, so check out the readme on the project for the deployment steps.
Testing it out
Once everything is deployed, it’s really simple to test it. All you need to do is go to the auto-scaling group for a test cluster and change the desired size of the group to be 1 less than it’s current size. This will cause the ASG to auto-select an EC2 instance to terminate, and kick off the draining workflow, which you should be able to see while watching the nodes in the kubernetes cluster:
# kubectl get nodes
NAME                                         STATUS                     ROLES    AGE     VERSION
ip-192-168-1-12.us-west-2.compute.internal    Ready,SchedulingDisabled   <none>   16d     v1.13.8-eks-cd3eb0
ip-192-168-1-42.us-west-2.compute.internal    Ready                      <none>   16d     v1.13.8-eks-cd3eb0
ip-192-168-1-129.us-west-2.compute.internal   Ready                      <none>   2d23h   v1.13.8-eks-cd3eb0
In the example above, ip-192-168-1-12.us-west-2.compute.internal is currently being drainer by the workflow. If you want to see further details of what’s going on, you can look at the CloudWatch logs for the Lambda:
Recieved a request to evict node ip-192-168-1-12.us-west-2.compute.internal

23:14:07
Cordoning Node ip-192-168-1-12.us-west-2.compute.internal
23:14:08
Evicting test-pod-549745db8d-5qktr in namespace ns1!
23:14:08
Evicting test-pod-5c85858bcf-ztcb4 in namespace ns2!
23:14:08
Evicting test-pod-596cf97d87-dg29z in namespace ns3!
...
23:14:09
Waiting for 28 pods to evict!
23:14:15
Waiting for 24 pods to evict!
23:14:21
Waiting for 15 pods to evict!
23:14:26
Waiting for 8 pods to evict!
23:14:31
Waiting for 5 pods to evict!
23:14:37
Waiting for 4 pods to evict!
23:14:42
Waiting for 4 pods to evict!
23:14:47
Waiting for 1 pods to evict!
23:14:52
Waiting for 1 pods to evict!
...
23:16:18
All pods have been evicted. Safe to proceed with node termination
That’s all there is to it! Be sure to check out the repo and happy draining!
Future Enhancements
Assuming that Amazon doesn’t introduce this as a native part of their deployed clusters, I’d like to look at moving this all to a daemonset that runs inside the cluster, and avoid the use of Lambda all together. I looked at this initially, but couldn’t easily find metadata that we could consume from within a daemonset pod that would warn me that a node was pending deletion. I’m sure there is a way, and one day I’d like to circle back and re-evaluate it.